
Microsoft Teams is more than just a tool for video calls and classroom chats.
Whether you’re a teacher trying to keep your classroom organized, a student juggling multiple assignments, or an administrator looking to streamline communication with prospective students, Teams has a lot to offer.
But like any tool, it works best when you know how to make the most of it.
In this article, we’ve gathered 15+ tips that will help you use Microsoft Teams for education the right way.
What Are the Advantages of Microsoft Teams in Education?
Microsoft Teams offers numerous benefits for educational institutions:
- All-in-one platform: MS Teams combines chat, video calls, file sharing, and collaboration tools in one space. You can easily organize lessons, share assignments, and communicate with students without switching apps.
- Real-time collaboration: Create collaborative classrooms by working together on documents, presentations, and projects in real-time, whether they’re in the same room or across the globe.
- Inclusive learning: Tools like “Together Mode” create a virtual classroom experience, making students feel more connected.
- 24/7 access to resources: Files, lesson materials, and recorded classes are stored in Teams, so students can access everything they need anytime, anywhere.
Tips and Tricks to Start Using Microsoft Teams for Education Effectively
Here are our top tips to get you started with MS Teams for education:
1. Invite colleagues, students, and prospects
Use organization-wide teams to invite colleagues, students, and even prospective students. This team brings everyone from different departments or classes together in one space When someone is added or removed in Microsoft 365, their presence in Microsoft Teams updates automatically.
You can use this feature to send out general announcements or important updates to everyone at once.
However, as things progress, it’s a good idea to create more specific teams based on departments, classes, projects, or other needs. Within each team, you can also set up channels to keep things organized.
For example, you could have a team for the entire MBA class, and within that team, create channels for individual courses.
2. Integrate live chat into Microsoft Teams for the ultimate higher education engagement tool
Let’s be real: higher education is more competitive than ever, and keeping your audience engaged is crucial. You need to make it easy for students, prospects, and alumni to connect with you, and live chat is the best way to do that.
Whether it’s future students, current ones, or alumni, they all have one thing in common: they love to chat. And since Microsoft Teams is already a powerful messaging platform, it can become your go-to hub for engaging with everyone in higher education.
You can even set up chatbots to handle common questions 24/7, freeing up your team for one-on-one sessions only when needed. For example, chatbots can tackle FAQs, while your educators provide personalized student support.
Social Intents offers live chat software that integrates seamlessly with Microsoft Teams. With this tool, you can connect with prospective students, current students, and alumni directly from your favorite collaboration platform, without switching between apps.
Plus, with chat translation features, you can easily communicate with international students, making it a fantastic support tool for global engagement.
Learn more about Social Intents here.

3. Use Microsoft Teams for more than just chatting
Microsoft Teams isn’t just about messaging. There’s so much more you can do:
- Share files: Share everything from assignments to project files right in the chat. No need for separate email chains or file-sharing services – it’s all integrated. You can even organize resources in a structured way, so students always know where to find materials.
- Real-time transactions: Need to collect fees for courses or events? You can share payment links within Teams and complete financial transactions securely and in real-time. It’s a seamless way to handle administrative tasks without switching platforms.
- Instant voice and video calls: While chatting, if you need a more in-depth discussion, switch to a voice or video call with a click. Whether you’re holding office hours, tutoring sessions, or group discussions, this feature makes it easy to transition from text to face-to-face interaction.
- Webinars and live classes: Microsoft Teams is perfect for hosting virtual classes, workshops, or webinars. With built-in tools for screen sharing, file sharing, and participant engagement, it’s a one-stop shop for hybrid learning models. You can even record sessions for students to revisit later or for those who missed the live class.
- Collaboration on projects: Microsoft Teams makes group projects a breeze. Create specific channels for each project where students can collaborate, share ideas, and work together in real-time. Add apps like OneNote or Planner to keep track of progress and deadlines.
- Integrated apps: Take advantage of Teams’ integration with other Microsoft apps like Word, Excel, and PowerPoint. Students can work on documents together in real-time without ever leaving Teams. Plus, there are tons of third-party app integrations like Trello or Kahoot! to boost engagement.
If you’re not sure how to access these features, make sure to read our Microsoft Teams handbook to get you familiar with the basics here.
4. Create standard or private channels based on student needs
In Microsoft Teams, channels are where the conversations happen, and they’re a great way to keep things organized.
You can create channels for different topics, departments, or projects – like “Admissions Department,” “Economics 1st Semester,” or “Career Counseling.” This way, students and colleagues can easily find discussions relevant to them.
Here’s how you can structure it:
- Standard channels: These are open to everyone on the team. For example, you might create a standard channel for a class, department, or batch. Everything posted here is searchable by all class team members, which makes it perfect for general discussions, course materials, and resources that all students or school staff need to access.
- Private channels: Sometimes, you need to keep certain conversations exclusive to a smaller group. If you’re handling something sensitive – like financial aid, counseling, or internal budget discussions – you can create private channels. Only those invited to the private channel will see or participate in the discussions.
Private channels are great for more focused conversations and allow you to collaborate securely without cluttering the main team space. Only the selected members or owners of the private channel can access it, so it’s ideal for smaller groups working on specific projects or confidential matters.
Here are the steps to create a channel:
- Click on Create and join teams and channels (the plus sign icon) at the top of your Teams list.
- Select Create channel.
- Choose the team where you want to host the new channel.
- Fill out the details by adding a name, an optional description, and selecting the channel type. This is where you can choose whether to make the channel standard, private, or shared based on your needs.
5. Schedule classes in Teams
Setting up interactive classes in MS Teams is easy, whether you’re doing it instantly or scheduling it for later.
Here’s how you can make the most out of it:
- Launch the meeting: To schedule a class, start by clicking on the Calendar icon on the left-side panel in MS Teams. From there, hit + New Meeting in the top right corner.
- Fill out the details: Add a title, date, and time for your class. You can invite specific students or select an entire team channel (like your course group) to ensure everyone in the class can join.
- Immediate or scheduled: If you want to start the class right away, click Meet Now, or you can schedule it for a later time by adjusting the date and time fields. You can also make these virtual meetings recurring – whether daily, weekly, or custom, depending on your course structure.
- Add students or channels: Make sure you’ve added your students by typing their names in the “Add required attendees” field or by selecting the relevant channel where all the students are already a part of the team. This way, all materials and recordings will be stored directly in the channel for easy access.
6. Use “Together mode” to give the feeling of a real classroom
Sometimes students studying online can feel disconnected, and let’s face it, staring at a bunch of tiles on a screen doesn’t exactly scream “classroom.”
Together mode in MS Teams was designed to bring a sense of community, especially during virtual classes.
You’ll find this feature in the in-call background options, and it basically places all your students or participants in a shared virtual space. It’s like everyone sitting together in a lecture hall but from the comfort of their own homes.
The whole idea is to make it feel more like a real classroom, and it definitely gives off that “we’re all in this together” vibe.

7. Share meeting recordings and transcripts with your students
Class recordings help bridge learning gaps and give students the flexibility to revisit lectures whenever they need to.
In Microsoft Teams, you can easily record your classes and provide both recordings and transcripts for students to review later.
To record a class, simply hit the Start Recording button in the meeting control panel. Once the session ends, the recording is automatically saved and stored securely in Microsoft Stream, where all students can access it. This is especially helpful for students who might have missed the live session or want to rewatch complex parts of the lesson.
Even better, you can enable meeting transcriptions. Teams can generate these transcriptions during or after the meeting, allowing students to read along as they watch the recording. It’s perfect for anyone who learns better through text or needs to search for specific points in the lecture.
8. Send urgent updates to students
When you need to get an urgent message out to students – or even parents – Microsoft Teams has a great feature for that.
Whether it’s for special classes, last-minute assessments, or emergency updates like campus closures due to severe weather, you can use the urgent message function to make sure no one misses the notification.
To send an urgent message, simply type your message in the chat or channel, then click on the exclamation point below the message box before hitting send. This flags the message as urgent.
Students will receive notifications every two minutes for the next 20 minutes, or until they read the message. It’s a super handy way to make sure your important announcements don’t get lost in the mix of regular updates.
9. Utilize commands for quick actions
If you’re looking to speed things up in Microsoft Teams, commands are your go-to shortcuts for performing frequent tasks.
You can use these to quickly jump to a specific channel, start a call, join a team, or even set your status. Just type a slash (/) in the search bar at the top of the app to see a list of available commands.
Some of the most useful ones include:
- /join – to join a team
- /call – to start a voice call
- /goto – to jump to a specific channel
- /unread – to see all your unread messages
However, if certain commands aren’t working, it might be because your institution has disabled features necessary for that command. For example, if chat is disabled by your admin, commands related to chat functions won’t work.
To stay updated, check Microsoft’s list of accepted commands for MS Teams.
10. Learn keyboard shortcuts for faster navigation
Want to work more efficiently in Microsoft Teams? Keyboard shortcuts are your best friend for quicker navigation.
Here are some of the key shortcuts for the desktop app:
- Go to a specific team or channel: Ctrl + G
- Start a new chat: Ctrl + N
- Close a window or menu: Esc
- Zoom in: Ctrl + = (Equals sign)
You can find the keyboard shortcuts for both desktop and web apps here.
11. Maximize productivity with “Do not Disturb” and unread messages
University staff are often swamped with tasks, especially during high-pressure times like admissions. Luckily, Microsoft Teams offers a few tools to help you stay productive without getting overwhelmed.
If you receive a message but can’t respond right away, you can mark it as unread or save it for later. Just click the three dots next to the message in your chat or activity feed and select the relevant option. This makes it easier to revisit important messages when you have time.
When you’re getting bombarded with messages and need some uninterrupted focus time, you can switch to Do Not Disturb (DND) mode. Just click on your profile picture, select Do Not Disturb, or simply type /dnd into the search bar.
This blocks notifications so you can keep working without distractions, but you can still review messages later by checking your unread ones.
12. Return to your favorite teams and channels easily
If there are certain teams or channels that you find yourself using regularly, like specific classes if you’re a teacher, or a financial aid group if you’re in the admin office, there’s an easy way to make sure they’re always within reach.
Instead of typing in commands or scrolling through the list, you can pin them for easy access. Just click the three dots next to the team or channel name and select Pin. This keeps them at the top of your list, making it super convenient to jump back in whenever you need.
You can pin multiple channels, organize them in any order, and unpin them as your priorities change. This way, your most important teams and channels are always at your fingertips.
13. Bring fun to your conversations
College life isn’t just about hitting the books – there’s always room for a little fun. And your conversations in Microsoft Teams can reflect that too. Make your chats with students and prospects more lively by using GIFs, stickers, and images to add some personality.
To use them, simply click on the GIF/Sticker icon in the message box and browse through the available options.
Before you start, make sure these features are enabled in both chat and conversations by your MS Teams admin.
14. Boost student morale with digital praise
Sometimes a little recognition can go a long way, and Microsoft Teams makes it easy to give your students a virtual pat on the back with the Praise feature. It’s a fun and thoughtful way to boost morale by sending badges like “Awesome” or “Achiever” directly in chats or channels.
To send praise, simply click the Actions and apps button below the message box, then select Praise. From there, choose a badge that fits the occasion – whether it’s acknowledging great participation, a job well done on a project, or just an overall positive attitude. You can even add a personal note to make it more meaningful.
Once you’ve previewed your message, hit Send, and it will appear in the conversation, bringing some well-deserved positivity into the group.
15. Send messages to different channels at once
Sometimes, you need to share the same information across several teams or channels in MS Teams.
Instead of manually copying and pasting the message, here’s how you can send it to multiple channels all at once:
- In a channel, click on New conversation, then select the Format icon (the “A” with a pen).
- Click Post in multiple channels and then Select channels.
- Choose the channels where you want to post your message. You can share on any channel where you’re a member.
- Once you’ve selected your channels, click Update.
- Type your message and hit Send.
Your post will automatically appear in all the channels you selected.
BONUS: Engage students by sending polls and surveys
Inclusion is an essential part of higher education, and listening to your students is a big part of that. One way to gather feedback and involve students in decision-making is by using polls and surveys directly within Microsoft Teams.
Here’s how you can do it:
- In the relevant chat or channel, click Forms.

- In the Forms window, enter your question and at least two answer options. You can add up to 10 choices if needed. If you’d like to allow multiple responses, toggle the Multiple Choice option.
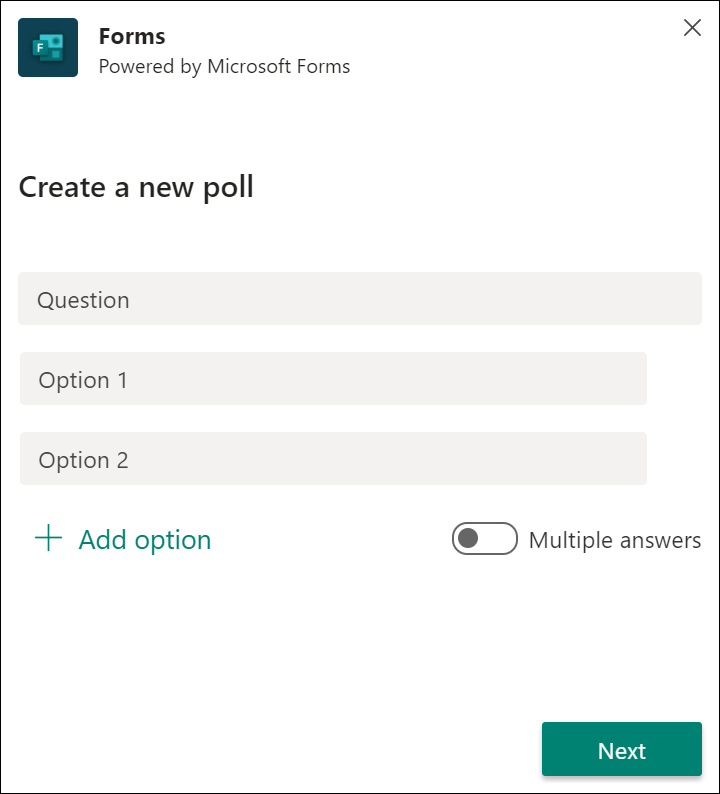
- Set preferences like sharing results automatically and whether responses will be anonymous.
- Before posting, preview your poll to make sure it looks right, then click Send.
The poll will be sent to your selected channel or chat, and participants can vote in real-time. You’ll be able to track results instantly and view detailed analytics by visiting Microsoft Forms online.
Drive Engagement With Microsoft Teams for Education
It is clear that Microsoft Teams is packed with tools that can transform the way you interact with students and staff, whether it’s organizing teams, hosting virtual classes, or sending urgent updates.
But why should stop there?
By integrating live chat software into MS Teams, you can double the benefits and boost engagement even further.
Social Intents can help you stay connected with students 24/7, offering real-time support, instant responses, and even handling FAQs through chatbots. It’s perfect for admissions, student services, and even global engagement with its multilingual features.
Plus, it seamlessly integrates with MS Teams, making it an easy-to-use option that requires no additional training. We know you’re already busy.
Get started with Social Intents with our 14-day free trial today.
